Introduction
This book is FRC team 3636's documentation for new members of its programming subteam. It is currently a work in progress being written by 3636's senior programmer members.
If you are already proficient in Java (or highly proficient in another language), you can skip Thinking in Java, and go straight to Using WPILib. Otherwise, start off with Thinking in Java.
Thinking in Java
This section introduces basic computer programming concepts and the Java programming language. If you are already familiar with Java or a similar high-level language, you can skip this section.
Note: this section hasn't yet been written. In the meantime, you can complete Codecademy's free Java course.
Using WPILib
Virtually all FRC teams, including 3636, use the WPILib library to program their robots. This section explains how to get started with WPILib and use it to program a robot.
You will learn how to:
- install WPILib and a suitable development environment;
- create a command-based WPILib project;
- build and deploy your code to a physical robot;
- create subsystems to abstract robot mechanisms;
- create commands to abstract robot actions;
- and bring it all together to drive a robot.
Resources
- WPILib's official documentation, particularly the Zero to Robot guide
- WPILib Javadocs
The Development Environment
Before you can start programming a robot, you'll need to install some software.
See also: WPILib's guide.
Installing WPILib
WPILib is available on Windows, macOS, and Linux.
Download the installer from this link (under the "Assets" section).
After you download and run the installer, it will prompt you to choose to install "tools only" or "everything." Unless you already have a preferred code editor installed, you should choose "everything" and select "download for this computer only" when it prompts you to install VS Code.
Downloading the code
Head over to our GitHub organization and either use VSCode's "Git: Clone" command to download the latest code or download it as a ZIP if you don't intend to change.
Using an alternative editor (optional)
If you chose not to install VS Code with the WPILib installer, you'll probably want to set up your editor of choice for use with WPILib.
First, you'll want Java IDE support. This comes built in on most IDEs such as IntelliJ, but if not you may need to find and install a plugin.
Then, you should install the WPILib extension, if there is one for your editor. VS Code has an official extension and IntelliJ has this well-supported community plugin.
Creating a Project
This chapter hasn't been written yet.
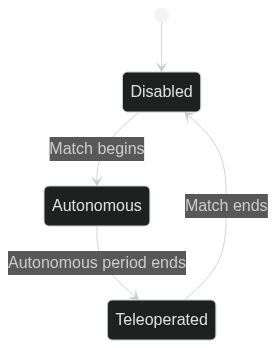
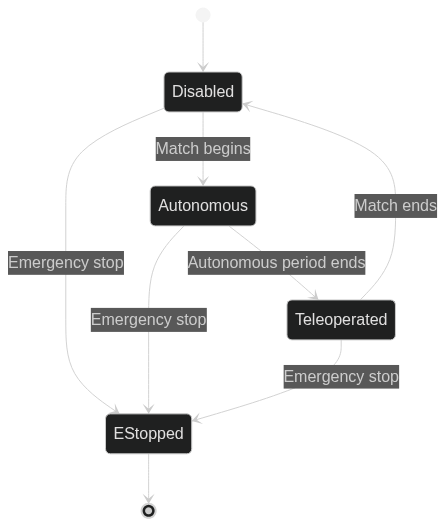
Robot States
Robots programmed with WPILib can be in one of four modes of operation, called states:
- Disabled: The robot does not accept user input and shouldn't move mechanisms. It is safe for humans to be around the robot while it is disabled. This is the default state.
- Teleoperated: The robot accepts user input and moves mechanisms. This is the most common state used while testing, and the teleoperated period of the FRC game is spent in this state.
- Autonomous: The robot does not accept user input, and instead goes through a sequence of preprogrammed actions. This state is active for the first 15 seconds in an FRC match.
- Emergency Stopped (E-Stopped): This is a special state which is identical to the disabled state, except that the bot cannot be re-enabled after it has been emergency stopped. This state is triggered by pressing the spacebar in FRC Driver Station.
Here's a table comparing each state:
| State | Moves | Accepts Input | Can Be Enabled |
|---|---|---|---|
| Disabled | No | No | Yes |
| Teleoperated | Yes | Yes | N/A |
| Autonomous | Yes | No | N/A |
| Emergency Stop | No | No | No |
Excepting emergency stops, the code will follow this flowchart during a match:
The complete flowchart with emergency stops looks like this:
Commands and Subsystems
WPILib supports two different programming paradigms, referred to as imperative and command-based programming. Most teams' preferred programming paradigm is command-based, because it is more flexible and easier to maintain. Unfortunately, it is also a little more difficult to learn.
Command-based programming uses three main abstractions: subsystems, commands, and inputs.
Subsystems
A subsystem encapsulates related lower-level robot mechanisms and defines the way the rest of the robot code interacts with them. For example, a subsystem might represent the motors and encoders in a drivetrain or the solenoids and motors in a deployable intake.
In WPILib, subsystems implement the Subsystem interface, which looks something like this (note this is pseudocode and not the actual interface):
public interface Subsystem {
    // this method is called regularly by the scheduler
    void periodic();
}
Typically, subsystems will have their own methods as well. For example,
public class Drivetrain implements Subsystem {
    // these fields represent the motor hardware
    // they are declared private because they should
    // never be accessed directly outside this subsystem
    private final leftMotor = ...;
    private final rightMotor = ...;
    // this field represents the encoder hardware
    private final encoders = ...;

    public void drive(double leftSpeed, double rightSpeed) {
        leftMotor.set(leftSpeed);
        rightMotor.set(rightSpeed);
    }

    public double getDistance() {
        // do odometry calculations
        // to get the distance the robot has traveled
        return ...;
    }
}
Commands
Commands encapsulate robot actions. They can run concurrently with other commands, meaning that multiple commands can run at the same time. Each command takes exclusive control of zero or more subsystems, and affects the robot by calling methods on those subsystems.
Note the requirement that commands take exclusive control of subsystems. This is to prevent a situation where two commands both try to use the same subsystem to do different things at the same time. Such a situation usually results in unexpected and unwanted behavior.
In WPILib, commands implement the Command interface, which looks something like this:
public interface Command {
    // this method is called periodically while the command is running
    void execute();

    // this method is called once when the command scheduled
    void initialize();

    // this method is called when the command ends
    // if the command was interrupted (i.e. canceled),
    // it is passed `true` as an argument, otherwise `false`
    void end(boolean interrupted);

    // this method is called periodically by the scheduler
    // to determine whether the command is finished
    boolean isFinished();

    // the scheduler calls this method to determine
    // which subsystems the command needs exclusive control of in order to run
    Set<Subsystem> getRequirements();
}
An example command using the Drivetrain subsystem described above might look like this:
public class DriveOneMeter implements Command {
    private final Drivetrain drivetrain;

    public DriveOneMeter(Drivetrain drivetrain) {
        this.drivetrain = drivetrain;
    }

    public void initialize() {
        // this method is called once when the command is scheduled
        // we can use it to reset the drivetrain's encoders
        drivetrain.resetEncoders();
    }

    public void execute() {
        // this method is called periodically while the command is running
        // we can use it to accelerate the drivetrain forward
        drivetrain.drive(0.5, 0.5);
    }

    public void end(boolean interrupted) {
        // this method is called when the command ends
        // we can use it to stop the drivetrain
        drivetrain.drive(0, 0);
    }

    public boolean isFinished() {
        // if the drivetrain has traveled more than 1 meter,
        // the command is finished
        return drivetrain.getDistance() >= 1;
    }

    public Set<Subsystem> getRequirements() {
        // tell the scheduler that this command requires
        // exclusive control of the drivetrain
        return Set.of(drivetrain);
    }
}
Inputs
Inputs are the way that the program receives information from the outside world. In imperative programming, the typical way to do this is to repeatedly read from a sensor in a periodic method; this method is called polling. But in command-based programming, we specify the commands that should run as a result of inputs declaratively in a single file.
The exception to this is analog inputs, which typically use the polling method.
Unlike the other abstractions, inputs aren't specific to each robot and written for us by WPILib, so we don't have to write them ourselves.
The important declarative WPILib input types are
Trigger,
Button,
and a few subclasses thereof.
There are also two important types representing imperative (polled) inputs:
DigitalInput
and AnalogInput. These are typically used directly in the periodic methods of subsystems or commands.
The Scheduler and Concurrency
If you read the pseudocode above closely, you may have noticed references to "the scheduler." If you don't understand concurrency, it might seem rather mystical, so I hope to demystify it a bit here.
Most likely, all the programs you've written so far have been synchronous. In synchronous programs, the program runs in a single thread so only one thing can happen at a time. Imagine a chef who can only do one thing at a time. If he wants to make a dozen sandwiches, he has to make one sandwich, then the next, then the next, etc; he can never work on more than one sandwich at a time.
This works fine for many programs,
but it's not ideal for robots.
We want our robot to be able to
do many things at once.
To do this,
WPILib uses a scheduler to enable concurrency.
Let's say that the scheduler
is executing two commands simultaneously: A and B.
It loop and alternates between calling
first A's execute method,
then B's execute method.
In this way,
both commands can run at the same time!
This would be like the chef
splitting up the task of making sandwiches
into parts.
First, he can lay out the bread for all the sandwiches in turn.
Then, he can add mayonnaise to all of them, and so on.
In the next chapter, you'll learn how to use commands and subsystems to create a basic program for your Romi.
Resources
Applied Command-Based Programming
Now that you understand what commands and subsystems are, you're ready to apply them to make a basic robot program.
Materials
- A Romi robot
- A computer with WiFi
- A USB game controller or joystick(s)
Driving the Romi
First,
create a new project
like you did in 2.2
using the Romi - Command Robot template for Java.
The template includes a few files that are important to understand:
RobotContainer.java- This file acts kind of like a "configuration" file for the robot. You'll use it to configure button bindings, to set auto commands, and for anything else which doesn't cleanly fit into a subsystem or command.subsystems/RomiDrivetrain.java- This is a subsystem abstraction for the Romi's drivetrain. It's a good example of a simple, idiomatic subsystem, and you'll be making use of it in this tutorial.
If you look at RomiDrivetrain.java,
you'll see that it has a few member variables
which represent the Romi's motors and encoders.
Then, it has methods which can be used
to control the motors and read from the encoders.
You'll be using these methods in the commands you write.
A Drive Command
Now, let's write a command.
Create a new file in the commands directory called ArcadeDriveCommand.java.
Then, scaffold a Command in it:
package frc.robot.commands;

import java.util.Set;

import edu.wpi.first.wpilibj2.command.Command;
import edu.wpi.first.wpilibj2.command.Subsystem;

public class ArcadeDriveCommand implements Command {
    public ArcadeDriveCommand() {
        System.out.println("Hello, World!");
    }

    @Override
    public Set<Subsystem> getRequirements() {
        return null;
    }
}
If you run the robot code now, nothing will happen. This is because, although you've created a command, you haven't told the robot to run it anywhere.
To do that,
you'll want to edit
the configureButtonBindings method in RobotContainer.java.
This method is called when the robot is initialized,
and is where button bindings are configured
using WPILib's input system.
Since you want the ArcadeDriveCommand to run most of the time,
you can set it to be the drivetrain's default command
with the following code:
import frc.robot.commands.ArcadeDriveCommand;

...

public void configureButtonBindings() {
    m_robotContainer.getDrivetrain().setDefaultCommand(
        new ArcadeDriveCommand());
}
Now, if you run the robot code, you should see the message "Hello, World!" printed to the console.
Now that your command is running, you can add some code to it to actually drive the robot.
First, you'll need to add a subsystem to the command.
This is done by creating
a member variable to hold the subsystem,
a constructor parameter to initialize it,
and adding it to the requirements returned by getRequirements:
public class ArcadeDriveCommand implements Command {
    private final RomiDrivetrain drivetrain;

    public ArcadeDriveCommand(RomiDrivetrain drivetrain) {
        this.drivetrain = drivetrain;
    }

    @Override
    public Set<Subsystem> getRequirements() {
        return Set.of(drivetrain);
    }
}
Since you need a way to get the speed and rotation values from the controller,
you should add two member variables which "supply" those values.
It would also be possible to read the values directly in the command,
but this spreads out control logic across multiple classes,
which is not ideal.
Instead, the control method will be defined
in the RobotContainer class when the command is constructed.
commands/ArcadeDriveCommand.java:
private final FloatSupplier speed;
private final FloatSupplier rotation;

public ArcadeDriveCommand(
    RomiDrivetrain drivetrain,
    FloatSupplier speed,
    FloatSupplier rotation
) {
    this.drivetrain = drivetrain;
    this.speed = speed;
    this.rotation = rotation;
}
RobotContainer.java:
public class RobotContainer {
    private final RomiDrivetrain romiDrivetrain = new RomiDrivetrain();

    private final Joystick joystick = new Joystick(0);

    public RobotContainer() {
        configureButtonBindings();
    }

    private void configureButtonBindings() {
        romiDrivetrain.setDefaultCommand(
            new ArcadeDriveCommand(
                romiDrivetrain,
                () -> (float) joystick.getY(),
                () -> (float) joystick.getX()));
    }

    public Command getAutonomousCommand() {
        return null;
    }
}
Note: if you're using a different kind of controller, you'll need to use different class(es) and methods to read the relevant values.
Then, you can use the drivetrain's methods
inside the command's execute method,
which is called repeatedly while the command is running:
@Override
public void execute() {
    drivetrain.arcadeDrive(speed.getAsFloat(), rotation.getAsFloat());
}
Now, run the robot and you should be able to drive it around!
Simulation
The WPILib simulator lets you control a (fake) robot without expensive real hardware. It's built into the project and runs the robot's code directly on your computer (rather than on the robot's RoboRIO computer).
Starting the simulator
After the robot's code is downloaded, a simulator can be opened by pressing Ctrl-Shift-P and selecting the "Simulate robot code" option. The robot's state can be controlled in the upper right hand corner.
Setting up controls
Enable keyboard control by dragging "Keyboard 0" onto the "Joystick 0" slot and "Keyboard 1" to "Joystick 1".
Joysticks
The robot is controlled using joystick input. In a real competition, these would be physical joysticks, but the simulator lets you use a keyboard to make it easier to test.
- Joystick 0 controls the robot's left/right/up/down movement.
- Joystick 1 controls the robot's rotation.
Keyboards
Keyboard controls in the simulator are fake joysticks that correspond to certain key combinations.
- Keyboard 0 means you're using WASD
- Keyboard 1 means you're using J and L
Seeing a 2D field
When using the robot in real life, it keeps track of where it thinks it is based on how far the wheels move and what it sees using its camera. In the simulator, this can be used to see how the robot thinks it will move after you input certain controls.
The NetworkTables menu in the simulator GUI can be used to view information directly connected to the robot's behavior - like the current controller sensitivity, or where the robot thinks it is on the field. Open NetworkTables > Shuffleboard > Auto > Field.
Controlling the robot (and how it responds to controls)
Setting up a 3D field (and common caveats)
Changing code to affect the simulator
SysID Tutorial
SysID (short for System Identification) is an app that is used to predict PID and Feedforward controller gains. It works by analyzing the velocity and position changes of a motor as a voltage is applied to it. It uses this date to estimate the theoretical optimal constants.
Preparation
The most important part of using SysID is creating and using a SysIdRoutine object in your robot code. When enabled, it calculates what changing or constant voltage should be applied to a system like an arm, elevator, or flywheel.
To set up a SysID routine, start by adding a setVoltage method to a subsystem's I/O layer:
interface ElevatorIO {
    // ...
    fun setVoltage(voltage: Voltage)
}
Implement it in each version of the I/O layer. For example, when using a TalonFX, the VoltageOut control request can be used. It's important ensure that when running SysID routines, the same method of motor control is used as when running the subsystem for real (for example, if using FOC for extra power, it should be enabled both during SysID and real motor usage).
class ElevatorIOTalon : ElevatorIO {
    private val motor = TalonFX().apply {
        // ... configuration ...
    }

    private val voltageControl = VoltageOut(0.0).apply {
        EnableFOC = true
    }

    override fun setVoltage(voltage: Voltage) {
        motor.setControl(voltageControl.withOutput(voltage.inVolts()))
    }
}
Then, back in the subsystem object, create a SysID object and the commands that activate it. When tuning a Phoenix 6 device, you should use the Phoenix 6 SignalLogger which automatically collects position, voltage, and velocity from motors:
object Elevator: Subsystem {
    private val io: ElevatorIO = ElevatorIOTalon()

    private val sysId = SysIdRoutine(
        SysIdRoutine.Config(
            0.5.voltsPerSecond, // Voltage change rate for quasistatic routine
            2.volts, // Constant voltage value for dynamic routine
            null, // Max time before automatically ending the routine
            {
                // Called when a routine is begun or ended
                // `it` contains the routine name and direction in a format parsable by SysID.
                SignalLogger.writeString("state", it.toString())
            }
        ),
        SysIdRoutine.Mechanism(
            io::setVoltage, // Set voltage of mechanism
            null, // Log voltage of mechanism (handled by SignalLogger already)
            this,
        )
    )

    // These commands delegate to the ones generated by SysID.
    fun sysIdQuasistatic(direction: Direction) = sysId.quasistatic(direction)!!
    fun sysIdDynamic(direction: Direction) = sysId.dynamic(direction)!!
}
Finally, add the bindings for the command to the Robot file.
private fun configureBindings() {
    // Start logging position, velocity, voltage, etc of all TalonFX motors.
    controller.leftBumper().onTrue(Commands.runOnce(SignalLogger::start))
    controller.rightBumper().onTrue(Commands.runOnce(SignalLogger::stop))

    controller.y().whileTrue(Elevator.sysIdQuasistatic(SysIdRoutine.Direction.kForward));
    controller.a().whileTrue(Elevator.sysIdQuasistatic(SysIdRoutine.Direction.kReverse));
    controller.b().whileTrue(Elevator.sysIdDynamic(SysIdRoutine.Direction.kForward));
    controller.x().whileTrue(Elevator.sysIdDynamic(SysIdRoutine.Direction.kReverse));
}
Routines
To run the routines and collect the data SysID needs, start by enabling the robot. Press Left Trigger to start logging data from TalonFX motors, then use each one of A/B/X/Y to run a routine on the mechanism. Pressing the button will start the mechanism and releasing will stop it by setting the output voltage to zero.
Turn off the TalonFX signal logger (right trigger) and disable the robot.
It might take a few attempts to run the routines successfully! Here are some tips for getting good results:
- Only run each routine once: Don't press A/B/X/Y multiple times - SysID doesn't understand multiple runs and it will look as though the mechanism "jumped" to it.
- Don't hit the hard stop: Running the mechanism past the end of its range of motion might cause SysID to think the mechanism has more friction than it actually does.
- Slow it down: If the routine is running too fast to record high-quality data, change the parameters passed to
SysIdRoutine.Configto make it run slower.
Retrieving data
The next step is to download the log data so that SysID can analyze it.
When not using TalonFX, SysID logs must be downloaded onto your laptop using the RoboRIO Data Log Tool (downloads available online).
Otherwise, use Phoenix Tuner X (downloads also available online):
- Navigate to Log Extractor.
- Download the log named with only capital letters and numbers.
- Select the signals
TalonFX-CAN_ID/MotorVoltage,.../Position, and.../Velocity, as well as the one namedstate. - Export in the
wpilogformat to Downloads.
More information: https://v6.docs.ctr-electronics.com/en/stable/docs/tuner/tools/log-extractor.html
Analysis
Open the SysId app (included in the WPILib suite), and use it to load the wpilog file you've downloaded. Drag & Drop the state signal, then the signals from the motor from the top left corner to the corresponding labels in the bottom left corner. Select the correct units (Phoenix Tuner X always uses rotations), and press the button to analyze the results.
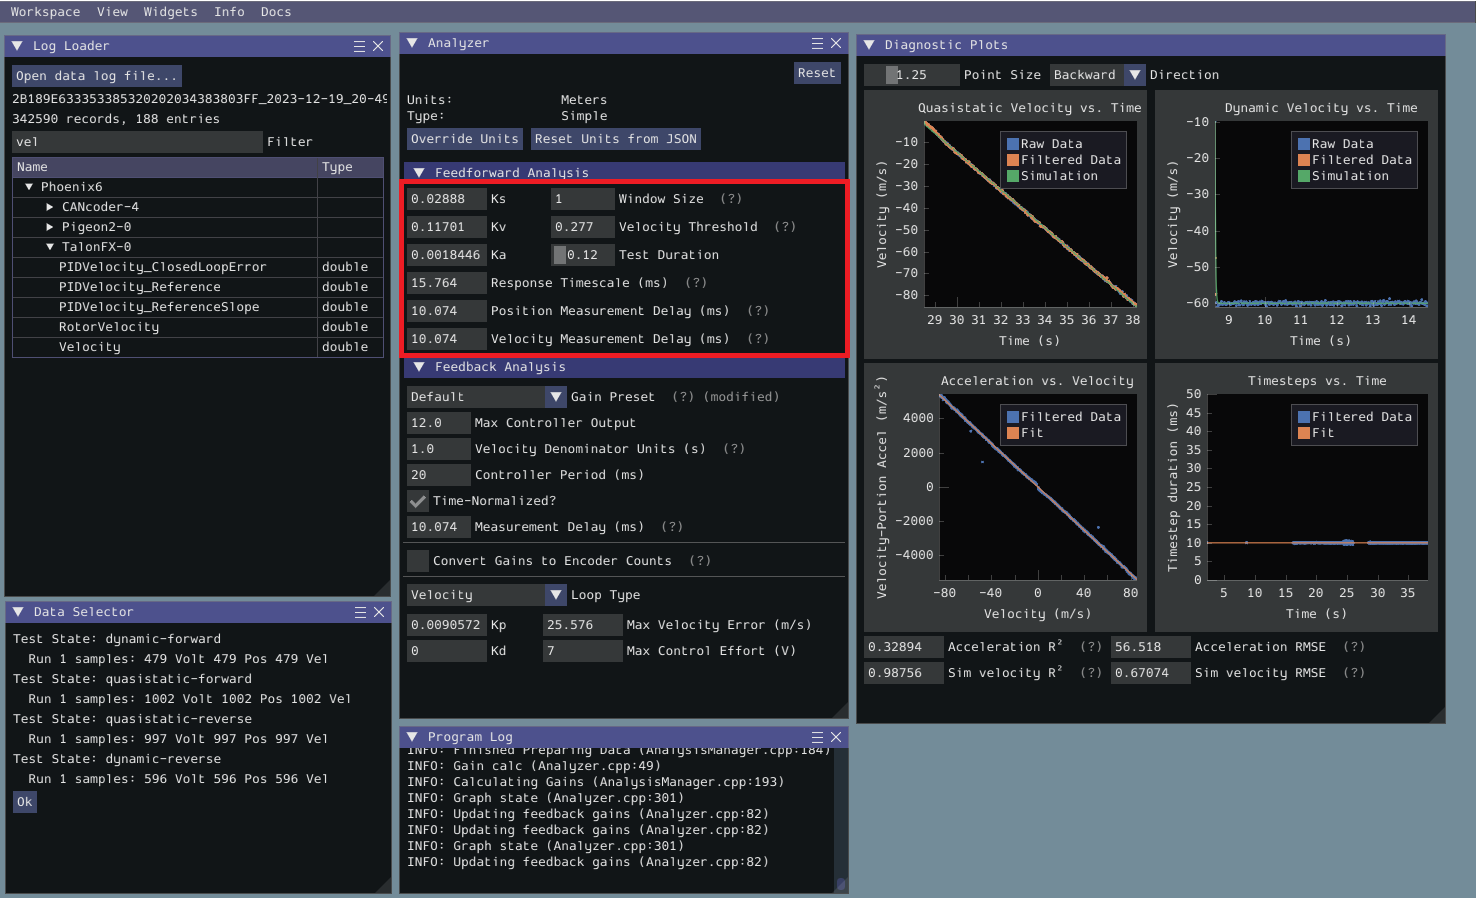
Before adding these values to your code, set the "Gain Preset" to the most applicable type of feedback controller and change the "Loop Type" to the type of feedback control you are using.
More information: https://docs.wpilib.org/en/stable/docs/software/advanced-controls/system-identification/analyzing-gains.html
Usage in code
Add the PID and Feedforward constants to the motor configuration, then use position control to command the motor to move to an angle.
class ElevatorIOTalon : ElevatorIO {
    private val motor = TalonFX().apply {
        // Configure motion control:
        Slot0.apply {
            pidGains = PIDGains(kP, 0.0, kD)
            motorFFGains = MotorFFGains(kS, kV, kA)
            // Optionally also set the gravity gain here for pivots and elevators:
            // kG = 123.4
            // GravityType = GravityTypeValue.Elevator_Static
        }

        MotionMagic.apply {
            MotionMagicCruiseVelocity = PROFILE_VELOCITY
            MotionMagicAcceleration = PROFILE_ACCELERATION
            MotionMagicJerk = PROFILE_JERK
        }

        // Make sure to also set brake mode, current limits, and the gear ratio to acceptable values.
    }

    private var positionControl = MotionMagicVoltage(0.0).apply {
        EnableFOC = true
    }

    override fun setDesiredPosition(position: Angle) {
        motor.setControl(positionControl.withOutput(position))
    }

    // For a linear system, you might want to accept a linear distance and then convert it like this:
    // override fun setDesiredPosition(position: Distance) {
    //     val angularPosition = position.toAngular(WHEEL_RADIUS)
    //     motor.setControl(positionControl.withOutput(angularPosition))
    // }
}
Motion Magic documentation: https://v6.docs.ctr-electronics.com/en/stable/docs/api-reference/device-specific/talonfx/motion-magic.html
Drive Auto Programming Language
The 3636 Auto Language ("autolang" or "drivelang") is a custom-made, text-based way to set what a robot does during the Autonomous period. Programs can be entered into a text field on the drive station Shuffleboard dashboard. The version described in this document was designed for the 2023 FRC robotics season.
Example program
intake cone 2;
score cone 1 low cone_right;
wait 5;
intake cone 3;
score cone 1 mid cone_right;
wait 1;
balance;
Commands
Instructions for the robot are called commands and are separated by semicolons (;). During the autonomous period, the robot completes each command, one after the other, from start to finish.
- intake (Piece) (Pre-placed Game Piece) [Pathing Mode]
- score (Piece) (Grid) (Node Level) (Node Column)
- balance
- leave_community
- wait (Time)
- drop (Drop Position)
Intake
This command makes the robot pick up the specified pre-placed game piece. Examples:
intake cone 1 ignore_obstacles;
intake cube 2;
Score
This command makes the robot score the currently loaded game piece at a certain grid, node level, and column. Examples:
score cube 1 low cube_left;
score cone closest mid cone;
Balance
Makes the robot balance on the charge station.
Leave Community
Makes the robot leave the community to earn a small amount of points.
Wait
Makes the robot wait a certain number of seconds. Example:
wait 5.1;
Drop
Makes the robot drop its game piece in a preset position, indicated by the number following the command. The lowest valid number is 1. Example:
drop 1;
...
drop 2;
Shoot (WIP)
Currently a work-in-progress but this will tell the the robot to shoot a cube (if held) on the open side of the grid or in place if specified.
Shoot in place:
shoot true;
Shoot on open side:
shoot;
Keywords and values
Keywords are used in conjunction with statements to configure where, when, and how the robot should do an action. They appear after the first word of a statement, in varying numbers and order. Keywords are separated by spaces.
some_command keyword1 125;
Piece
A game piece. There are two options: cube and cone.
Node Level
The height at which to score a game piece. There are three options: low, mid, and high.
Node Column
The horizontal position to score at. There are three options: cone_left, cube, and cone_right. When not using the low node level, these columns should only be used with the game piece in their name.
Grid
1, 2, or 3, or closest. When scoring, refers to which grid to score at.
Pre-placed Game Piece
Configures the robot to pick up a certain pre-placed game piece. When the robot on the blue team side, this is counted from left to right. When the robot is on the red team side, this is counted from right to left. The options are 1, 2, or 3, 4, or closest.
Drop Position
A number that controls where the robot drops a game piece. There are several preset positions where the robot can drop, and setting this to the index of the desired drop position will make the robot drop the game piece at that position.
Pathing Mode
Whether the robot should consider obstacles when driving to its new location. Can be omitted. The default value is avoid_obstacles.
Can be avoid_obstacles to drive around them or ignore_obstacles to act as if they're not there.
Time
A positive decimal point number that controls how long the robot should wait, measured in seconds.
Scratch-like auto builder
You can access a Scratch version of autolang at https://frc3636.github.io/auto-builder/. Right-click the background and click "Export" to copy the generated code to your clipboard. This was designed to be used at outreach events so that curious visitors could try controlling the robot. The right-click-to-export process is designed to be a little bit confusing to young kids who aren't familiar with computers so that their code can be reviewed by a team member beforehand.