SysID Tutorial
SysID (short for System Identification) is an app that is used to predict PID and Feedforward controller gains. It works by analyzing the velocity and position changes of a motor as a voltage is applied to it. It uses this date to estimate the theoretical optimal constants.
Preparation
The most important part of using SysID is creating and using a SysIdRoutine object in your robot code. When enabled, it calculates what changing or constant voltage should be applied to a system like an arm, elevator, or flywheel.
To set up a SysID routine, start by adding a setVoltage method to a subsystem's I/O layer:
interface ElevatorIO {
    // ...
    fun setVoltage(voltage: Voltage)
}
Implement it in each version of the I/O layer. For example, when using a TalonFX, the VoltageOut control request can be used. It's important ensure that when running SysID routines, the same method of motor control is used as when running the subsystem for real (for example, if using FOC for extra power, it should be enabled both during SysID and real motor usage).
class ElevatorIOTalon : ElevatorIO {
    private val motor = TalonFX().apply {
        // ... configuration ...
    }

    private val voltageControl = VoltageOut(0.0).apply {
        EnableFOC = true
    }

    override fun setVoltage(voltage: Voltage) {
        motor.setControl(voltageControl.withOutput(voltage.inVolts()))
    }
}
Then, back in the subsystem object, create a SysID object and the commands that activate it. When tuning a Phoenix 6 device, you should use the Phoenix 6 SignalLogger which automatically collects position, voltage, and velocity from motors:
object Elevator: Subsystem {
    private val io: ElevatorIO = ElevatorIOTalon()

    private val sysId = SysIdRoutine(
        SysIdRoutine.Config(
            0.5.voltsPerSecond, // Voltage change rate for quasistatic routine
            2.volts, // Constant voltage value for dynamic routine
            null, // Max time before automatically ending the routine
            {
                // Called when a routine is begun or ended
                // `it` contains the routine name and direction in a format parsable by SysID.
                SignalLogger.writeString("state", it.toString())
            }
        ),
        SysIdRoutine.Mechanism(
            io::setVoltage, // Set voltage of mechanism
            null, // Log voltage of mechanism (handled by SignalLogger already)
            this,
        )
    )

    // These commands delegate to the ones generated by SysID.
    fun sysIdQuasistatic(direction: Direction) = sysId.quasistatic(direction)!!
    fun sysIdDynamic(direction: Direction) = sysId.dynamic(direction)!!
}
Finally, add the bindings for the command to the Robot file.
private fun configureBindings() {
    // Start logging position, velocity, voltage, etc of all TalonFX motors.
    controller.leftBumper().onTrue(Commands.runOnce(SignalLogger::start))
    controller.rightBumper().onTrue(Commands.runOnce(SignalLogger::stop))

    controller.y().whileTrue(Elevator.sysIdQuasistatic(SysIdRoutine.Direction.kForward));
    controller.a().whileTrue(Elevator.sysIdQuasistatic(SysIdRoutine.Direction.kReverse));
    controller.b().whileTrue(Elevator.sysIdDynamic(SysIdRoutine.Direction.kForward));
    controller.x().whileTrue(Elevator.sysIdDynamic(SysIdRoutine.Direction.kReverse));
}
Routines
To run the routines and collect the data SysID needs, start by enabling the robot. Press Left Trigger to start logging data from TalonFX motors, then use each one of A/B/X/Y to run a routine on the mechanism. Pressing the button will start the mechanism and releasing will stop it by setting the output voltage to zero.
Turn off the TalonFX signal logger (right trigger) and disable the robot.
It might take a few attempts to run the routines successfully! Here are some tips for getting good results:
- Only run each routine once: Don't press A/B/X/Y multiple times - SysID doesn't understand multiple runs and it will look as though the mechanism "jumped" to it.
- Don't hit the hard stop: Running the mechanism past the end of its range of motion might cause SysID to think the mechanism has more friction than it actually does.
- Slow it down: If the routine is running too fast to record high-quality data, change the parameters passed to
SysIdRoutine.Configto make it run slower.
Retrieving data
The next step is to download the log data so that SysID can analyze it.
When not using TalonFX, SysID logs must be downloaded onto your laptop using the RoboRIO Data Log Tool (downloads available online).
Otherwise, use Phoenix Tuner X (downloads also available online):
- Navigate to Log Extractor.
- Download the log named with only capital letters and numbers.
- Select the signals
TalonFX-CAN_ID/MotorVoltage,.../Position, and.../Velocity, as well as the one namedstate. - Export in the
wpilogformat to Downloads.
More information: https://v6.docs.ctr-electronics.com/en/stable/docs/tuner/tools/log-extractor.html
Analysis
Open the SysId app (included in the WPILib suite), and use it to load the wpilog file you've downloaded. Drag & Drop the state signal, then the signals from the motor from the top left corner to the corresponding labels in the bottom left corner. Select the correct units (Phoenix Tuner X always uses rotations), and press the button to analyze the results.
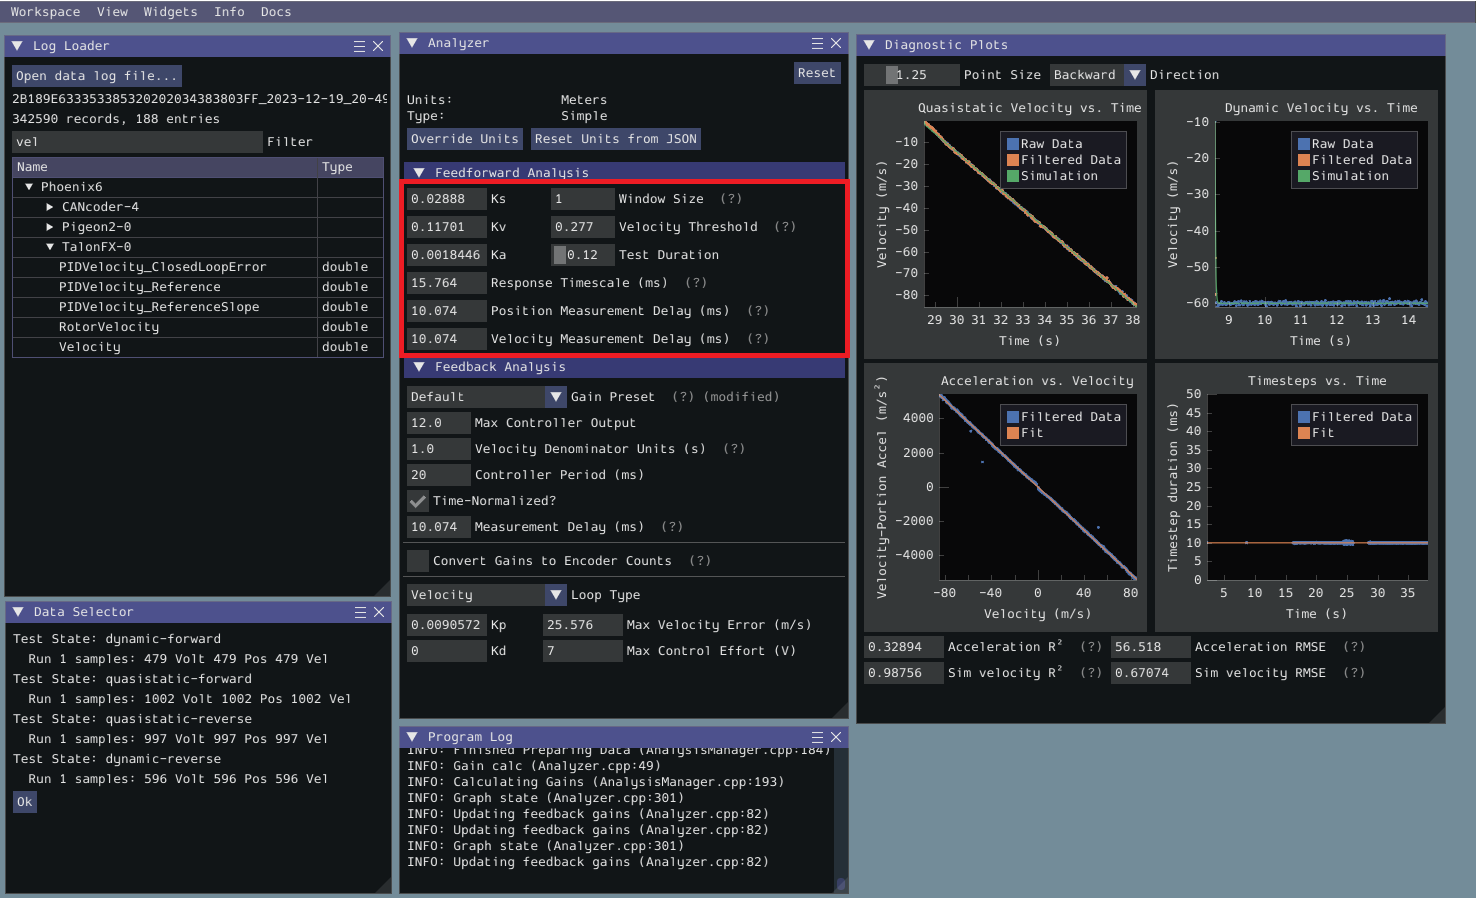
Before adding these values to your code, set the "Gain Preset" to the most applicable type of feedback controller and change the "Loop Type" to the type of feedback control you are using.
More information: https://docs.wpilib.org/en/stable/docs/software/advanced-controls/system-identification/analyzing-gains.html
Usage in code
Add the PID and Feedforward constants to the motor configuration, then use position control to command the motor to move to an angle.
class ElevatorIOTalon : ElevatorIO {
    private val motor = TalonFX().apply {
        // Configure motion control:
        Slot0.apply {
            pidGains = PIDGains(kP, 0.0, kD)
            motorFFGains = MotorFFGains(kS, kV, kA)
            // Optionally also set the gravity gain here for pivots and elevators:
            // kG = 123.4
            // GravityType = GravityTypeValue.Elevator_Static
        }

        MotionMagic.apply {
            MotionMagicCruiseVelocity = PROFILE_VELOCITY
            MotionMagicAcceleration = PROFILE_ACCELERATION
            MotionMagicJerk = PROFILE_JERK
        }

        // Make sure to also set brake mode, current limits, and the gear ratio to acceptable values.
    }

    private var positionControl = MotionMagicVoltage(0.0).apply {
        EnableFOC = true
    }

    override fun setDesiredPosition(position: Angle) {
        motor.setControl(positionControl.withOutput(position))
    }

    // For a linear system, you might want to accept a linear distance and then convert it like this:
    // override fun setDesiredPosition(position: Distance) {
    //     val angularPosition = position.toAngular(WHEEL_RADIUS)
    //     motor.setControl(positionControl.withOutput(angularPosition))
    // }
}
Motion Magic documentation: https://v6.docs.ctr-electronics.com/en/stable/docs/api-reference/device-specific/talonfx/motion-magic.html